This tutorial is our how-to guide for using Webmail.
It does not cover every aspect of Webmail.
Instead, it focuses on some of the most popular features.
General
Jump to any section:
What browsers can I use to view my mail?
What makes up the Webmail application?
Navigating Webmail using the sidebar
Work Area
What browsers can I use to view my mail?
Webmail supports the following browsers:
- Microsoft Internet Explorer 9.0 and higher
- Mozilla Firefox 2.0 and higher
- Chrome 1.0 and higher
- Safari 3.2 and higher
- Konqueror 3.5 and higher
Note: You may be able to view the Webmail interface on other, unsupported browsers; however, some features may produce unexpected results.
What makes up the Webmail application?
Webmail is comprised of the following components: Mail, Contacts, Files, Calendar, RSS (optional), Admin (on applicable accounts), and Settings. Each part is tied together with the sidebar and contains a work area.
Navigating Webmail using the sidebar
The sidebar in webmail is available on the left-hand side of the window no matter which component that you’re currently viewing. The sidebar includes:
- Access to the six Webmail components
- Quick access to compose new messages
- Admin access depending on your account
- Help access
- A Logout button
Work Area
Each Webmail component is divided into two or three work areas which are designed to take advantage of a wide-screen view. These sections automatically hide as you shrink the web browser down in size but are still accessible by a toggle at the top of the visible pane.
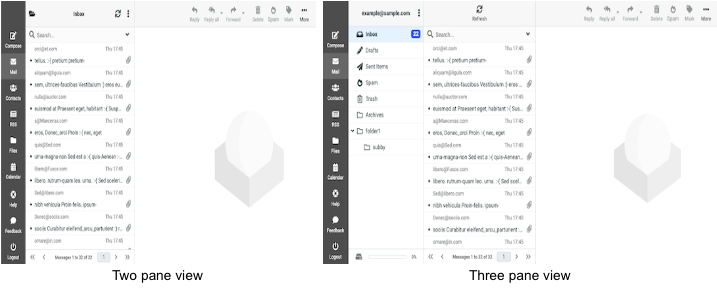
As the default view, the Mail tab provides you with access to essential email functions. It has three main panes, including the Mail folders list, message list and message preview.
Jump to any section:
How do I check to see if I have new mail?
How do I filter to see all unread messages?
How do I adjust the Mail panes?
How do I select multiple messages?
How do I mark one or more messages as spam?
What if the message is not spam?
How do I manually mark one or more messages as read or unread?
How do I flag messages?
How do I delete messages?
Composing messages
How do I compose and send a new message?
How do I reply, reply to all or forward a message?
How do I use the text editor options?
How do I use Spellcheck?
How do I insert an image in my message?
How do I attach a file to a message?
Is there a limit to the size of the emails that I can send?
Using Mail Folders to organize
What are system Mail folders?
What are personal Mail folders?
How do I add a new folder?
How do I sort messages within a folder?
How can I find a specific message within a folder?
How do I rename, empty, or delete a folder?
How do I move one or more messages to another folder?
How do I set up Webmail to automatically move messages to folders?
How do I check to see if I have new mail?
To check for new mail, click Refresh from the toolbar. The contents of all system and user-defined folders are updated immediately.
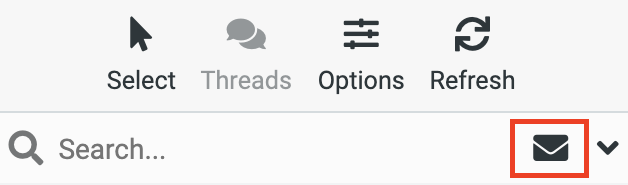
How do I filter to see all unread messages?
Messages within folders can be quickly sorted to show just the unread messages. Click the envelope icon at the top of the message column in the right-hand corner of the search bar to see just the unread messages.
How do I adjust the Mail panes?
- From the Mail tab, navigate to the bottom right-hand corner of the pane that you want to adjust.
- Click and hold the small triangle in the bottom right-hand corner.

- Drag to adjust.
How do I select multiple messages?
- Access the Mail tab.
- Click the Select button at the top of the message list.
- Use the checkbox that appears beside each message to select or unselect.
Note: The message details pane does not display information for multiple selections. - Once you have all the messages that you’d like selected, you can move the message into a folder, delete all, flag them or report them as Spam.
How do I mark one or more messages as spam?
Clicking the Spam button results will move the message to the Spam folder, and it sends information to the spam filtering engine so that the filtering rules can be updated to catch future similar spam messages. This helps update webmail filtering and improves it to reflect the current trends of spammers.
Note: Messages in the Spam folder are automatically deleted after 30 days.
To mark one or more messages as Spam:
- Select the message(s) you would like to mark as Spam.
- Click the Spam button from the message list toolbar.
- The message is moved to your Spam folder.
What if the message is not spam?
Legitimate emails can accidentally be tagged as spam. There are many reasons for this including, but not limited to, message subject, content, or message routing.
Any message that has been marked as spam and sent to your Spam folder will be deleted after 30 days. For this reason, it is good practice to review the contents of your Spam folder occasionally.
To mark one or more messages as not spam:
- Select the message(s) you would like to mark as not spam.
- Click the Not spam button from the message list toolbar.
Marking a message as Not spam will both move the message to your Inbox, and it sends information to the spam-filtering engine so that the filtering rules can be updated to improve future recognition of valid emails similar to the one marked.
How do I manually mark one or more messages as read or unread?
- Select the message(s) you would like to mark as read or unread.
- From the Mark drop-down list in the header, choose As read or As unread.
Alternatively, click the circle icon beside the message.
How do I flag messages?
If there are messages that you want to return to at a later time, you can flag them to make them easier to find later on. Flagged messages display in the column.
- Select the message(s) you want to flag.
- From the Mark drop-down list in the header, choose As flagged or hover to the right of the message in the message list and click the flag icon when it comes available.
To remove the flag from one or more messages, select the messages, and from the Mark drop-down menu, choose As unflagged.
How do I delete messages?
- Select the message(s) you would like to delete.
Alternatively, click a message to display its contents in the message details pane. - Click the Delete button.
- When messages are deleted from the Inbox, Sent, Drafts or user-defined folders, they are temporarily moved to the Trash folder. When messages are deleted from the Trash folder, they are permanently deleted.
Composing messages
How do I compose and send a new message?
- Click Compose.
- Address your email using the To field.
- Click the Plus icon at the end of the To field to add the option of a Cc, Bcc, Reply-to or Followup-to field.
Note: Reply-to sets a different email address that recipients will send replies to when they select reply. Followup-to is useful when posting to mailing lists so that replies are sent to the list address but not to your personal address. - Type the subject in the Subject field.
- Compose your message and attach any attachments in the message field.
- Click Send in the bottom left-hand corner of the message window.
How do I reply, reply to all or forward a message?
- Select the email that you would like to reply or forward from the message list.
- Choose the option that best suits your needs from the toolbar.
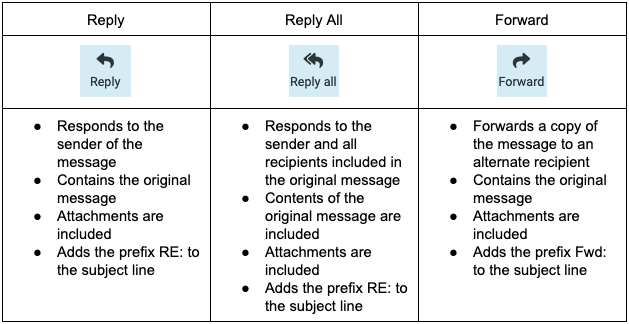
- Compose your message and select Send.
How do I use the text editor options?
The text editor offers the ability to send as a plain text email or for additional formatting, the ability to send an HTML email.

How do I use Spellcheck?
Spellcheck is available in 44 different languages from the toolbar in the compose window. Use the drop-down list to choose the language that you want to apply.
- In the drop-down list, choose the language that you are using.
As you type, any questionable spelling is highlighted. - When Spellcheck is active (indicated by the icon being lit up), left-click highlighted words to see a list of correctly spelled replacements.
Right-click to use your browser’s built-in spellcheck function. If Spellcheck is active, you’ll see both lists. - Select the correct replacement option.
- Repeat steps 2 and 3 as necessary.
How do I insert an image in my message?
You can insert images in the body of your message, and you can specify the size of those images. Inserted images are referenced by their URL and may be any type of image file format, for example, .jpg, .gif, or .png. The referenced images can be located somewhere on the Internet, or they can be in your Files folders.
- Click the insert image icon from the text editor.
- Copy and paste in the URL of the source image into the source field or select the file selection option, and choose Add file.
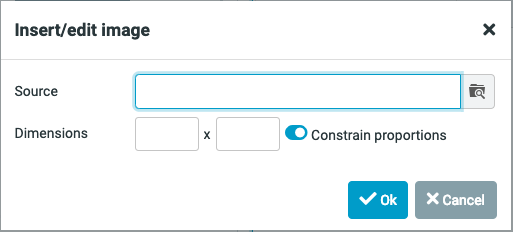
- Adjust the dimensions as needed.
- Click Ok.
How do I attach a file to a message?
- Click the Attach button from the top toolbar.

- Browse to the file you want to attach and click Open.
- The attachment will appear in the Options and attachments pane once uploaded.
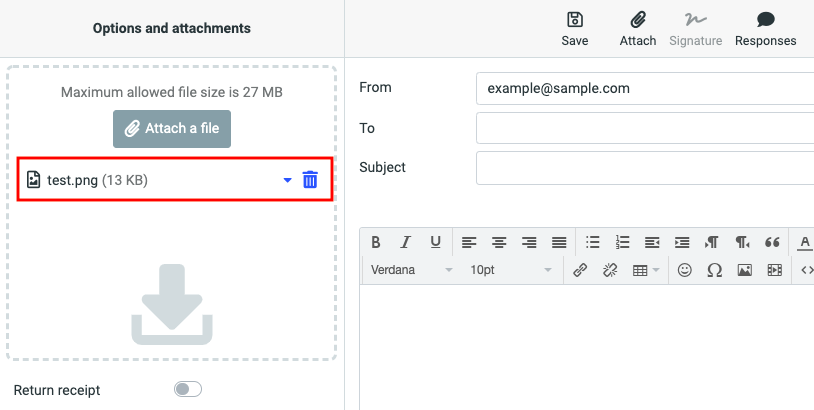
Is there a limit to the size of the emails that I can send?
The maximum size for email messages, including any attachments, is 35 MB; however, when attachments are sent over the Internet, they must be MIME encoded, and this encoding increases the size of the message. Besides, some mail servers will not accept large email messages, so if you attach a large file to your message, it may not reach its intended recipient.
You should not try to send attachments that are larger than 27 MB. If you want to share large files, we recommend that you store them in the Files section and share the file rather than attaching it to an email.
Using Mail Folders to organize
What are system Mail folders?
The system folders (Inbox, Drafts, Spam, Sent, and Trash) are permanent system folders that support basic email functions. You cannot add, rename or remove a system folder, though you can add sub-folders to any of the system folders.
What are personal Mail folders?
Personal folders are the user-defined folders. You can create and name folders for the personal organization of mail messages up to a system defined limit. User-defined folders can be added, renamed, removed and emptied. You can add these folders at the top, or parent, level or as sub-folders. Sub-folders can also be added to other sub-folders.
Personal folders appear below the system folder list, after the Trash folder. Sub-folders that are added to system folders appear below their parent in the system folders list.
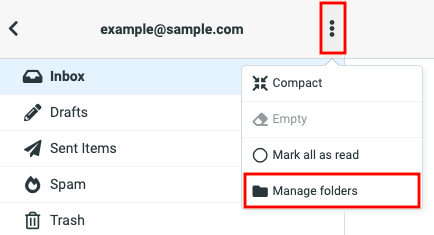
How do I add a new folder?
- At the top of the folders list, select the Menu icon (three vertical dots) and then click Manage folders.
- Click Create.
- Type the name of the new folder in the Folder name field.
- If you want to add the new folder as a sub-folder of an existing folder, choose the folder from the Parent folder drop-down list.
- From the List view mode drop-down list, choose whether you want messages in the folder to be displayed as a list or as threads.
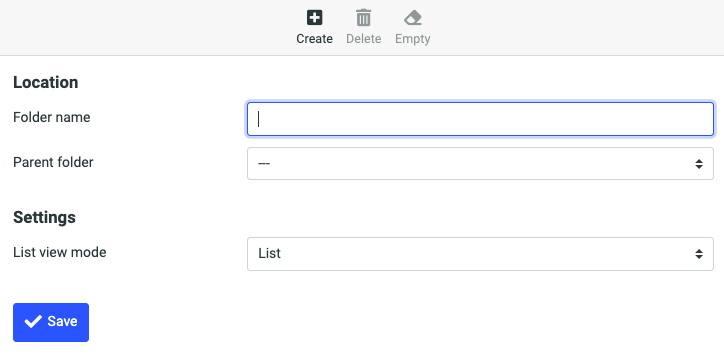
- Click Save.
The new folder appears under the systems folders list or as a sub-folder of a parent folder, depending on which option you choose.
How do I sort messages within a folder?
When you look at a mail folder, the contents are displayed in date order from most recent to oldest. To sort messages within a folder by different criteria:
- Click the folder name in the Mail folder list.
- Select Options from the toolbar over the message list.
- Choose which sorting column you would like to use—Arrival date, Sent date, Subject, From/To, From, To, CC, or Size—and select if you would like it to be ascending or descending and if you would like conversations to be grouped by threads and then click Save.
How can I find a specific message within a folder?
You can perform a case-insensitive search for characters or words that appear in the following areas of the message:
- Subject: Search the Subject line of the message.
- From: Search the From line of the message.
- To: Search the To line of the message.
- Cc: Search the Cc line of the message.
- Bcc: Search the Bcc line of the message.
- Body: Search the body of the message.
- Entire message: Search the Sender, Subject, and Headers plus the body of the message.
Note: We recommend that you do not use the entire message search as your primary search type. Depending on how many messages there are in the selected folder, a message search can take a long time, and your Webmail session could time out before the search completes.
To search within a selected folder:
- Select the folder you want to search in by clicking on it in the Mail folder list.
- In the search field, select the type of search from the drop-down list.
- Type your search criteria in the search field and then press Enter.
- Any messages matching the criteria are displayed.
To clear the search results, click the X in the corner of the search field.
How do I rename, empty, or delete a folder?
- At the top of the folders list, choose the Menu icon (three vertical dots) and then click Manage folders
- Click the folder that you want to rename, empty, or delete.
- Do one of the following:
- To rename the folder, enter the new name in the Folder name field, and click Save.
- To empty the folder, select Empty from the toolbar and then Delete on the confirmation message.
Note: These messages are still recoverable until you empty your Trash folder. - To delete the folder, select Delete from the toolbar and when the confirmation pop-up appears, select Delete again.
Note: The folder is deleted, and the messages in that folder are moved to the Trash folder.
How do I move one or more messages to another folder?
- Select the message(s) that you would like to move.
- In the Mail header, click More, then click Move to, and select the folder to which you want to move the selected messages.
- Alternatively, after selecting the messages, press and hold the left mouse button and slide your cursor to the folder to which you want to move the messages, and then release the mouse button.
How do I set up Webmail to automatically move messages to folders?
Webmail allows you to use filters to sort and order incoming mail. Mail can be identified using a combination of criteria and conditions to trigger one of three actions:
- Forward message to
- Move to folder
- Delete email message
Managing Address Book Contacts
The Contacts tab is where you add, group, manage and delete contact information. Contacts supports drag-and-drop so you can quickly move contacts to groups. You can also address messages to one or more contacts from within the Contacts pane. The Contacts tab is divided into three panes: groups, contacts list, and contact details.
Jump to any section:
How do I add a contact?
How do I select multiple contacts?
How do I search for contacts?
Using groups in Contacts
How do I create a group?
How do I add one or more contacts to a group?
How do I remove contacts from a group?
How do I rename or delete a group?
Importing contacts
Can I import contacts?
How do I add a contact?
You can add contacts from the Contacts tab or directly from your email.
To add a contact in the Contacts tab:
- Click Contacts from the sidebar.
- Select Create from the top toolbar.
- Fill in the contact information in the blank contact card that appears in the details pane.
- Click Save.
To add a contact from your email:
- Select an email from the person that you would like to add.
- In the email details, click on the email address in the header.
- From the options, select Add to address book.

- The email will be automatically added to your address book.
Once the contact is created, you can display the contact and then click the Groups tab to assign the contact to one or more groups. Toggle on the groups where you want to add this contact. All contacts belong to the Contacts group by default, but they can be added to as many other groups as you’d like.
How do I select multiple contacts?
- Access the contact list.
- Click the Select button at the top of the contact list.
- Use the checkbox that appears beside each contact to select or unselect.
Note: The contact details pane does not display information for multiple selections. - Move the contacts into a group for future use, or select Compose from the sidebar to start an email to the selected contacts.
How do I search for contacts?
The basic search located at the top of the contact list uses display name, email, first name, last name and all fields. If you want to do an advanced search,
- Click Contacts.
- Select Search from the toolbar.
- In the Advanced search pop-up, complete as many fields as you can to narrow your search. Advanced search will allow you to search by any of the contact card fields and any information entered in the search will remain if you need to change between the tabs.
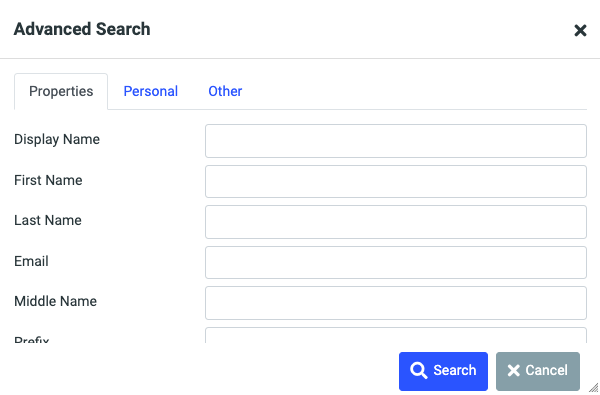
- Click Search and the contacts that match your search criteria display in the Contacts list pane.
Using groups in Contacts
How do I create a group?
Groups are an excellent way to create a list of commonly emailed contacts for quick access and easy addressing. The Groups list displays alphabetically, and contacts can be added to multiple groups at once.
- At the top of the Groups pane, click the three vertical dots icon to access the menu.
- Select Add group.
- In the pop-up, type the name of the new group in the text field.
- Click Save.
How do I add one or more contacts to a group?
You can add contacts to a group by displaying the contact, and then selecting the group to which you want to assign the contact, or you can select one or more contacts and drag the contacts to the group.
- Dragging a contact from one group to another will result in a copy being placed in the new group.
- You can drag the same contact to multiple groups.
- You can drag multiple contacts at the same time.
To add one or more contacts to a group:
- Access the Contacts list.
- Click Select and select the contacts that you would like to add to a group.
- Drag and drop the contacts onto the group or click More and Assign to group.
How do I remove contacts from a group?
Note: A contact cannot be removed from the Contacts group.
- From the Groups list, click the group that you want to edit.
- Click Select and choose the contacts that you want to remove from the contact list.
- Select More.
- Choose Remove from group.
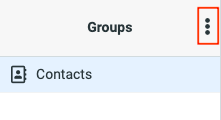
How do I rename or delete a group?
- Locate the group in Contacts.
- Click the menu button (three vertical dots at the top of the Groups menu).
- Select Rename group or Delete group.
- If renaming a group, enter the new name and select Save. The new name will appear in the Groups list in alphabetical order.
- If deleting the group, select Delete in the pop-up confirmation window that appears.
Importing contacts
Can I import contacts?
Webmail allows you to import a list of contacts from another mail application that is in vCard or CSV format.
- Go to Contacts.
- Click Import in the toolbar at the top.
- In the Import contacts pop- up window, click Choose file and select to the vCard or CSV file that you want to upload.
- Select the Open button.
- Choose the group that will contain the new contacts from the Import group assignments drop-down list. If you don’t select this option, the contacts will be imported into the Contacts group only.
- Select if you want to Replace your entire address book with this import.
- Click Import.
- Once you get the confirmation, close the Import contacts window by clicking the X in the upper left corner.
Using the Calendar
The Calendar component allows you to create and view calendars. The Calendar component includes four different views (Day, Week, Month and Agenda,) event creation and calendar sharing.
Jump to any section:
How do I add a new calendar?
How do I edit a calendar?
How do I delete a calendar?
How do I add an event to my calendar?
How do I edit an event?
How do I delete an event?
How do I add a new calendar?
- Click the Calendar tab.
- Select the Menu icon (three vertical dots).
- Choose Add calendar.
- Enter a name and color for your new calendar.
- Click Save.
How do I edit a calendar?
- Click the Calendar tab.
- Highlight the calendar you want to edit, and from the Menu icon, choose Edit/share calendar or double-click the calendar that you want to edit.
- In the calendar properties pop-up, edit the name and color of the calendar.
- Select Save.
How do I delete a calendar?
- Click the Calendar tab.
- Highlight the calendar you want to delete.
- From the Menu icon (three vertical dots), choose Delete calendar.
- In the confirmation pop-up, select Delete to confirm.
How do I add an event to my calendar?
An event is anything that you want to schedule on your calendar, for example, a meeting or an appointment.
Note: It is possible to add more than one event in the same time slot.
- Click Create or click the date when you want to add the event in the Calendar.
- Complete the fields on the Summary tab.
- Summary: The text that will appear in the calendar time slot.
- Location: The location where the event will take place.
- Calendar: Use the drop down to choose the calendar in which to schedule the event.
- Start date and End date: Click the fields and select a date or date range for the event. If All Day is not checked, you can specify the start and end times.
- Description: Enter any additional information you want about the event.
- Reminder: Set a reminder notification.
- Category: Choose from Personal, Work, Family, or Holiday.
- Status: Set the status of the event as Confirmed, Cancelled, or Tentative.
- Show me as: Choose Busy, Free, or Tentative from the menu.
- Priority: Set the priority.
- Privacy: Choose from Public, Private and Confidential.
- URL: Add a URL to the event.
- Optionally, click the Reoccurance tab and complete the following fields:
- Repeat: Choose whether you want to create a recurring event, and the frequency with which you want it to recur: Never, Daily, Weekly, Monthly, Annually or On dates.
- Every: Set how often you want the event to happen, for example, every two weeks.
- On: Set when you want the event to occur on, like the day of the week or the day of the month.
- Until: Set an end date for the repeat.
- Optionally, click the Participants tab to invite additional participants to the event.
- Optionally, click the Attachments tab and add an attachment.
- Click Save.
How do I edit an event?
- Click the event that you want to edit.
- Click Edit.
- Make changes to any of the editable fields on any tab. Edits to recurring events will be applied to all the events.
- Click Save.
How do I delete an event?
- Click the event that you want to delete.
- Select Delete.
- In the confirmation pop-up, click Ok to confirm.
Using the RSS Section
The RSS section allows you to view content from your favorite blogs or websites. Instead of going to each website to look for new content, your favorite sites are listed in the RSS section. When you click on one of the feeds in the list, you see a description of the items on that site.
The items are ordered from newest to oldest, and the list is updated regularly. Each item includes a link to a web page where you can read the complete article.
The RSS component is made up of the RSS feed list and RSS feed display.
Jump to any section:
How do I add a feed?
How do I access a feed?
How do I delete a feed?
How do I add a new category?
How do I reorder feeds and categories?
How do I add a feed?
- In the RSS section, click Actions in the top right-hand corner.
- If you know the URL of the feed that you want to add, click Subscribe to feed.
- Type the URL in the Feed or site URL field.
- Optionally, choose a category from the Place in category drop-down list.
- Click Subscribe.
How do I access a feed?
- In the feeds list, just click the name of the feed that you want to view.
The articles in the feed are displayed in the central area, with the most recent article at the top of the list. - To read any of the articles in full, click on the article’s title to go to that website.
How do I delete a feed?
- Right-click the feed that you want to delete, and choose Edit feed.
- Click Unsubscribe.
- Alternatively, click to display the feed and then choose Unsubscribe from the Actions menu.
- In the confirmation pop-up, click Ok.
How do I add a new category?
Categories allow you to group feeds and make it easier to locate the ones you want to view.
Note: When you create a new category, it is not displayed in the list pane until at least one feed has been added to it.
- From the Actions drop-down list, choose Preferences.
- On the Feeds tab, from the Categories drop-down list, choose Add category.
- Enter the name of the category you want to create in the Category title field, and then click Ok.
- Optionally, move one or more existing feeds into this new category. You can click and drag a feed into the category folder, or you can click the feed to display its properties, choose a category from the Place in category drop-down list, and then click Save.
- Click Exit preferences to return to the feeds list.
How do I reorder feeds and categories?
By default, categories and the feeds within each category are listed alphabetically, but you can change their position.
- From the Actions drop-down list, choose Preferences.
- Click the Feeds tab.
- Click a feed or a category and drag it to its new location in the list.
- Click Exit preferences to return to the feeds list.
File Storage & Sharing Files
You can use Files to store and share up to 2000 files as long as you don’t exceed your total allowed space quota. You can create up to 100 folders, including sub-folders, with up to 1000 files in any one folder.
Note: File and folder names can be any length, but if the name is longer than 80 characters, the name is truncated in the File Sharing display, and the missing part of the name is replaced by ellipses (…).
Jump to any section:
How do I upload files to my Files section?
What type of files can I upload?
How do I create folders?
How do I move files into a folder?
How do I delete a file or folder?
How do I create a subfolder?
Can I reorder my file folders?
Can I take a file that was sent to me in an email and save it to my Files section?
Can I take a file that is saved in my Files section and attach it to an email?
How do I share files or folders?
How do I upload files to my Files section?
Before you can upload a file, you first have to save the file to your computer, and then you can upload it to the Files section.
- Click the Files tab.
- Navigate to the folder where you want to store the file.
- Click Upload file here.

- Navigate to the location of the file that you want and click Open.
- Your file will be uploaded to the specified location that you chose.
What type of files can I upload?
You can upload any type of file as long as you don’t exceed your total space quota. For example, you can upload data files such as Word, Excel and PDF, as well as photos and videos.
How do I create folders?
You can create up to 100 folders, including subfolders. Subfolders can contain other subfolders as well, and you can nest subfolders up to 5 subfolders deep. All folders are displayed in alphabetical order.
- Click the Files tab.
- Select Create folder from the toolbar at the top.
- In the text field, enter a name for the folder.
Note: Folder names cannot include forward slashes and cannot begin with a period (.), and the names cannot be index.htm or index.html. - Press the check mark.
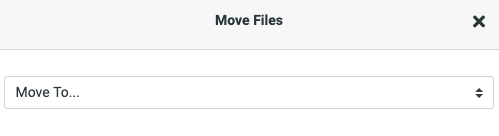
How do I move files into a folder?
When you upload files to the Files section, you can specify the folders where you want to store them. If you have already uploaded files, you can move the files into any of your existing folders.
- Click the Files tab.
- Select the file(s) that you want to move.
- Choose Move from the actions toolbar.
- Using the Move to drop down, select the folder that you would like to move the file(s) into.
How do I delete a file or folder?
- Click the Files tab.
- Hover your cursor over the file or folder that you want to delete.
- Click Delete.
- Click Ok to confirm the deletion.
Note: When you delete a folder, you also delete all of the files and subfolders that are in that folder. If you delete a file that is shared, anyone who was viewing the file will no longer be able to see it.
How do I create a subfolder?
- Click the Files tab.
- Select the folder that you want to be the parent folder.
- Click Create folder and enter the name of your subfolder.

Can I reorder my file folders?
Files and folders will always display in alphanumerical order.
Can I take a file that was sent to me in an email and save it to my Files section?
If you receive a file in an email and you want to save it to the File sharing, you first need to save it to your computer. You can then upload the attachment back into your Webmail Files.
Can I take a file that is saved in my Files section and attach it to an email?
You cannot attach a file that is in Files to an email message; however, you can email the URL for the file.
How do I share files or folders?
To share a file or folder, you must first mark it as shared. Then you can let people know about your file or folder by posting its URL (via email, website, blog, twitter, etc.).
The file names still appear in the list, and you can rename or delete them, but no one will be able to view or download the files until sufficient time has passed.
- Go to the Files tab.
- Select the file or folder that you want to share.
- Choose Share, and a link will be created.
- Select the link icon beside the shared file, and the URL will display beneath the file for you to copy and paste wherever you would like to share.
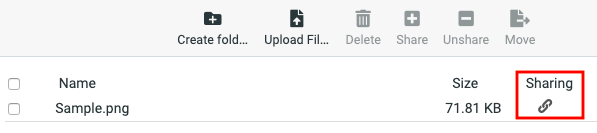
- When anyone clicks on the URL or pastes it into a browser, the corresponding file or folder is displayed.
Using the Settings Component
The Settings component allows you to configure general settings for each of the mailbox components (for example, display, and language preferences), mail settings (setup, autoresponders, signature, allow and block lists, and forwarding options), and spam settings.
Jump to any section:
How do I change my password?
How do I enable and disable my vacation or out of office alert?
How do I enable and disable my email signature?
How do I change the time zone for my email account?
What are Mail filters?
What is plus sign tagging and how do I use it with filters?
How do I add or remove mail filters?
How do I get my folders to sync across all of my devices?
How do I add or remove another email account?
How do I set an allowed or blocked senders list?
How do I change the font size?
How do I select multiple emails?
How do I adjust the subject line or the sender for better visibility?
Settings options and locations
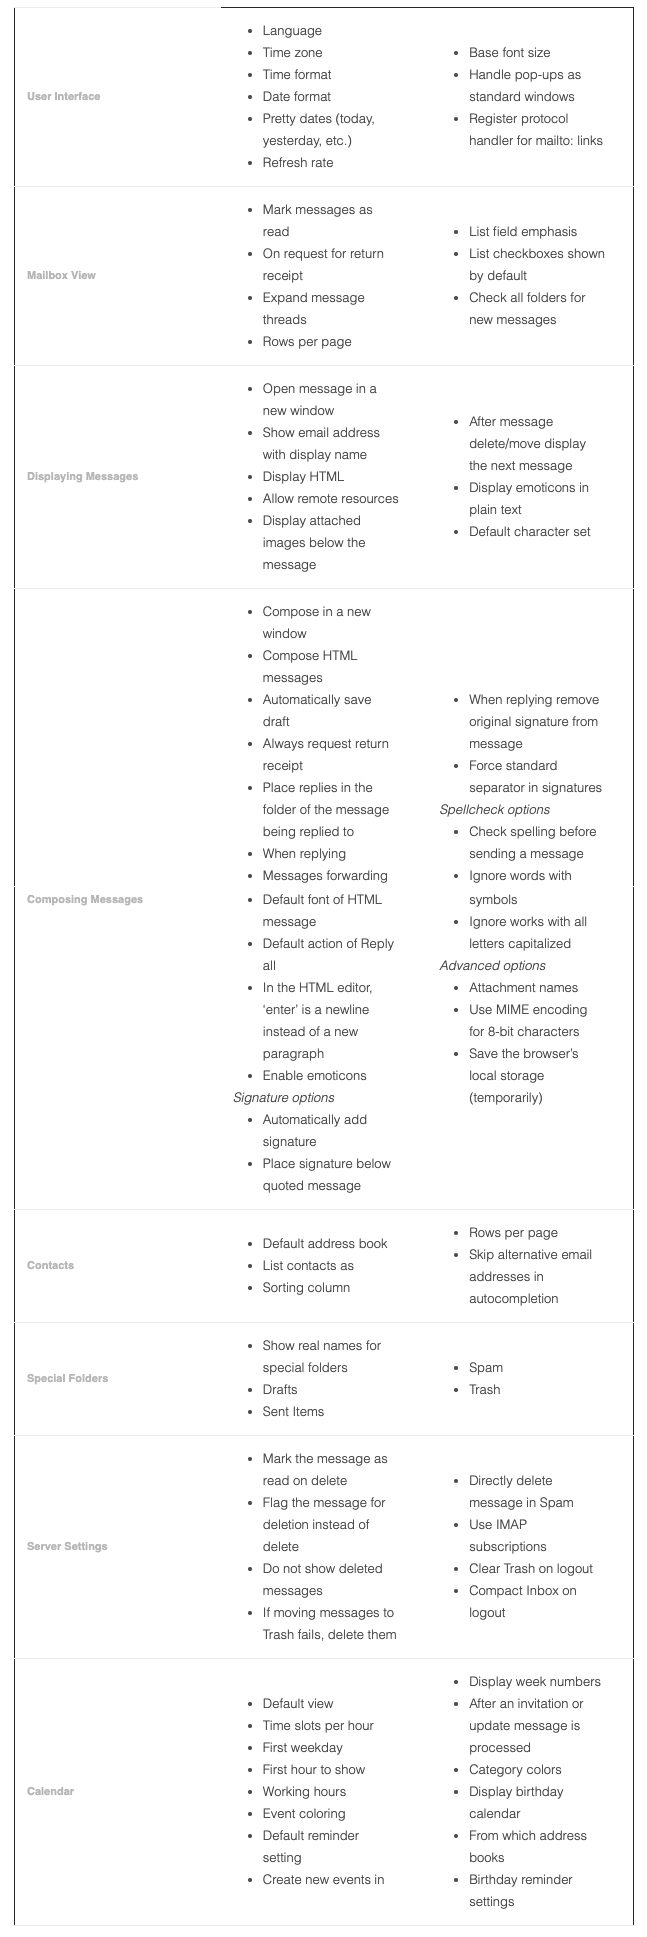
Preferences map
Folders
Identities
Responses
Other accounts
Password
Autoresponder
Spam settings
Mail forwarding
Password recovery
Filters
External access
How do I change my password?
- In the Settings window, click Password.
- Type your current password in the Current password field.
- Type your new password in the New password field.
- Re-type your new password in the New password (again) field.
- Click Save.
How do I enable and disable my vacation or out of office alert?
To enable a vacation or out-of-office alert, you need to set up an autoresponder message.
- In the Settings tab, click Autoresponder.
- In the Autoresponse text field, type the message you would like automatically sent in reply to all incoming email messages.
- Click the Enabled checkbox.
- In the Interval field, enter the number of days before the same recipient will receive the auto-response message again. If not specified, the interval defaults to one day.
- Click in the End date field, and select the date when you want to stop the autoresponse message from being sent.
- Click Save.
To disable autoresponder
- In the Settings tab, click Autoresponder.
- Remove the checkmark from the Enabled checkbox.
- Click Save.
How do I enable and disable my email signature?
- In the Settings tab, click Identities.
- Select your email account or Create.
- In the Signature field, enter the signature details to appear at the end of all outgoing email messages.
Note: If you primarily send formatted (HTML) messages, you can enable the HTML option which allows you to add formatting of your signature.
- Click Save.
To disable an email signature
- In the Settings window, click Identities.
- Select your account.
- Delete the text in the Signature text field.
- Click Save.
How do I change the time zone for my email account?
- In the Settings tab, click Preferences > User Interface.
- In the Time zone field, select your time zone from the dropdown menu.
- For PST/PDT (Pacific), choose “(GMT -08:00) America/Los Angeles”
- For Arizona, choose “(GMT -07:00) America/Phoenix”
- For MST/MDT (Mountain), choose “(GMT -07:00) America/Denver”
- For CST/CDT (Central), choose “(GMT -06:00) America/Chicago”
- For EST/EDT (Eastern), choose “(GMT -05:00) America/New York”
- Click Save.
What are Mail filters?
A filter is a set of conditions that you define to handle incoming email automatically. You can set filters to sort incoming email to various folders, delete unwanted messages, or forward messages to other email accounts. The action you prepare is triggered when the rules you create are found to be true.
Webmail can analyze the following fields in the message header: Subject, From, To, size, and a wildcard that you can define.
The fields can be evaluated according to the following conditions: Does or does not contain, is or is not equal to, does or does not exist and does or does not match expression. You define the value of the condition.
What is plus sign tagging and how do I use it with filters?
Plus sign tagging allows you to identify and filter incoming email according to a tag that you add to your email address when you give your email address to an individual, a group, or a business.
To use plus sign tagging, you just enhance your email address by adding a plus sign (+) after your name—but before the @ symbol—followed by some identifying text. You can set up filtering rules that recognize incoming mail that is sent to the tagged address and move it to a specific folder.
By using the plus tagging feature, you will also know whether your email address has been sold to a third party. If you start receiving unwanted or spam email that is addressed to your plus sign tagged email address, you will know that your email address was sold, and you can easily create a filtering rule that deletes any future email that is sent to that tagged address.
How do I add or remove mail filters?
To add a filter
- In the Settings list, click Filters.
- Click Create from the toolbar.
- In the Filter name field, enter a name for your filter.
- Under Scope, select when you want the filter to act.
- Matching all of the following rules
- Matching any of the following rules
- All messages
- Specify the Rules:
- From the first drop-down list, select the message area that you want to evaluate (From, Subject, To, etc.).
- In the next drop-down list, select a condition (contains, does not contain, etc.).
- In the text field, type in a value for the filter to evaluate incoming mail against.
- Click the Plus sign (+) to add additional rules, the Gear to set modifiers to the rule, or the Trash to remove a rule.
- In the Actions section, select how you want the filter to handle messages that match the conditions you defined:
- Move message to
- Redirect message to
- Discard with message
- Delete message
- Keep message in Inbox
- Stop evaluating rules
- Click the Plus sign (+) to add additional actions or the Trash to delete an action.
- Click Save.
To remove an existing filter
- Click Settings, and select Filters.
- Under the existing Filters List, and select the filter you want to remove.
- Click the Actions icon and then choose Delete.
- The filter is removed from the Filters list.
To disable a filter
- Click Settings, and select Filters.
- Under the existing Filters list, click the filter to select it.
- Click the Actions gear icon and then choose Enable/disable filter set.
Optionally, in the Filter definition pane, toggle on Filter disabled and click Save. - The filter is greyed out in the Filters list and will not execute, but can be re-enabled at a later.
How do I get my folders to sync across all of my devices?
You may notice that when you make a change in a folder on your webmail, it doesn’t change on your other devices where you view your mail, like your phone. With IMAP subscription, your folders will stay in sync across all of your devices.
- In the Settings tab, select Preferences.
- Click Server settings.
- Turn the toggle on for Use IMAP subscriptions.
- Select Submit.
How do I add or remove another email account?
- In the Settings tab, select Other accounts.
- Click Add.
- Fill in the email, username, password, server address, server port and if SSL should be used based on the information provided by your email provider.
- Select the Leave a copy of the message on the server checkbox if you want to leave your read email messages on the other server.
- From the Default folder drop-down, choose the folder to which you want to save the email messages that are retrieved from the other account.
- Select the Test connection on save option if you want to test the connection to this account when you save the configuration.
- Select the Import old messages option if you want to import all existing messages from the account. If you don’t select this option, only new, unread messages will be imported.
- Click Submit.
How do I set an allowed or blocked senders list?
The allowed and blocked senders lists let you create a list of senders that will either be automatically allowed and bypass your spam filter or be automatically blocked from being received into your inbox.
Addresses that are in your Contacts are considered to be in your allowed senders list even though the contact entries are not displayed in the allowed senders list. If you add an address to the blocked senders list that is also in your Contacts, the address will be blocked as the blocked senders list takes precedence over your Contacts.
The allowed and blocked senders list uses the star (*) as a wildcard which lets you set up to block or allow any emails from a specific domain. These should be used with caution as you may accidentally block every email sent from *@gmail.com for example.
You can add up to 1,000 entries each in the allowed and blocked list.
To adjust the allowed or blocked senders list
- In the Settings tab, click Spam settings.
- Add or remove the email address on a separate line to the Allowed senders list or the Blocked senders list text field.
Note: If you want to block an entire domain, use the star (*) to denote a wildcard before the at (@) symbol. - Select Save when you’re done.
How do I change the font size?
If you find that the default font size of 14 px is too small or too large for you, we offer the ability to decrease the size up to 10 px or increase to 20 px to your own preferences.
- In the Settings tab, click Preferences.
- Select User Interface.
- Click on the drop-down menu next to Base font size to choose your preferred size.
- Click Save.

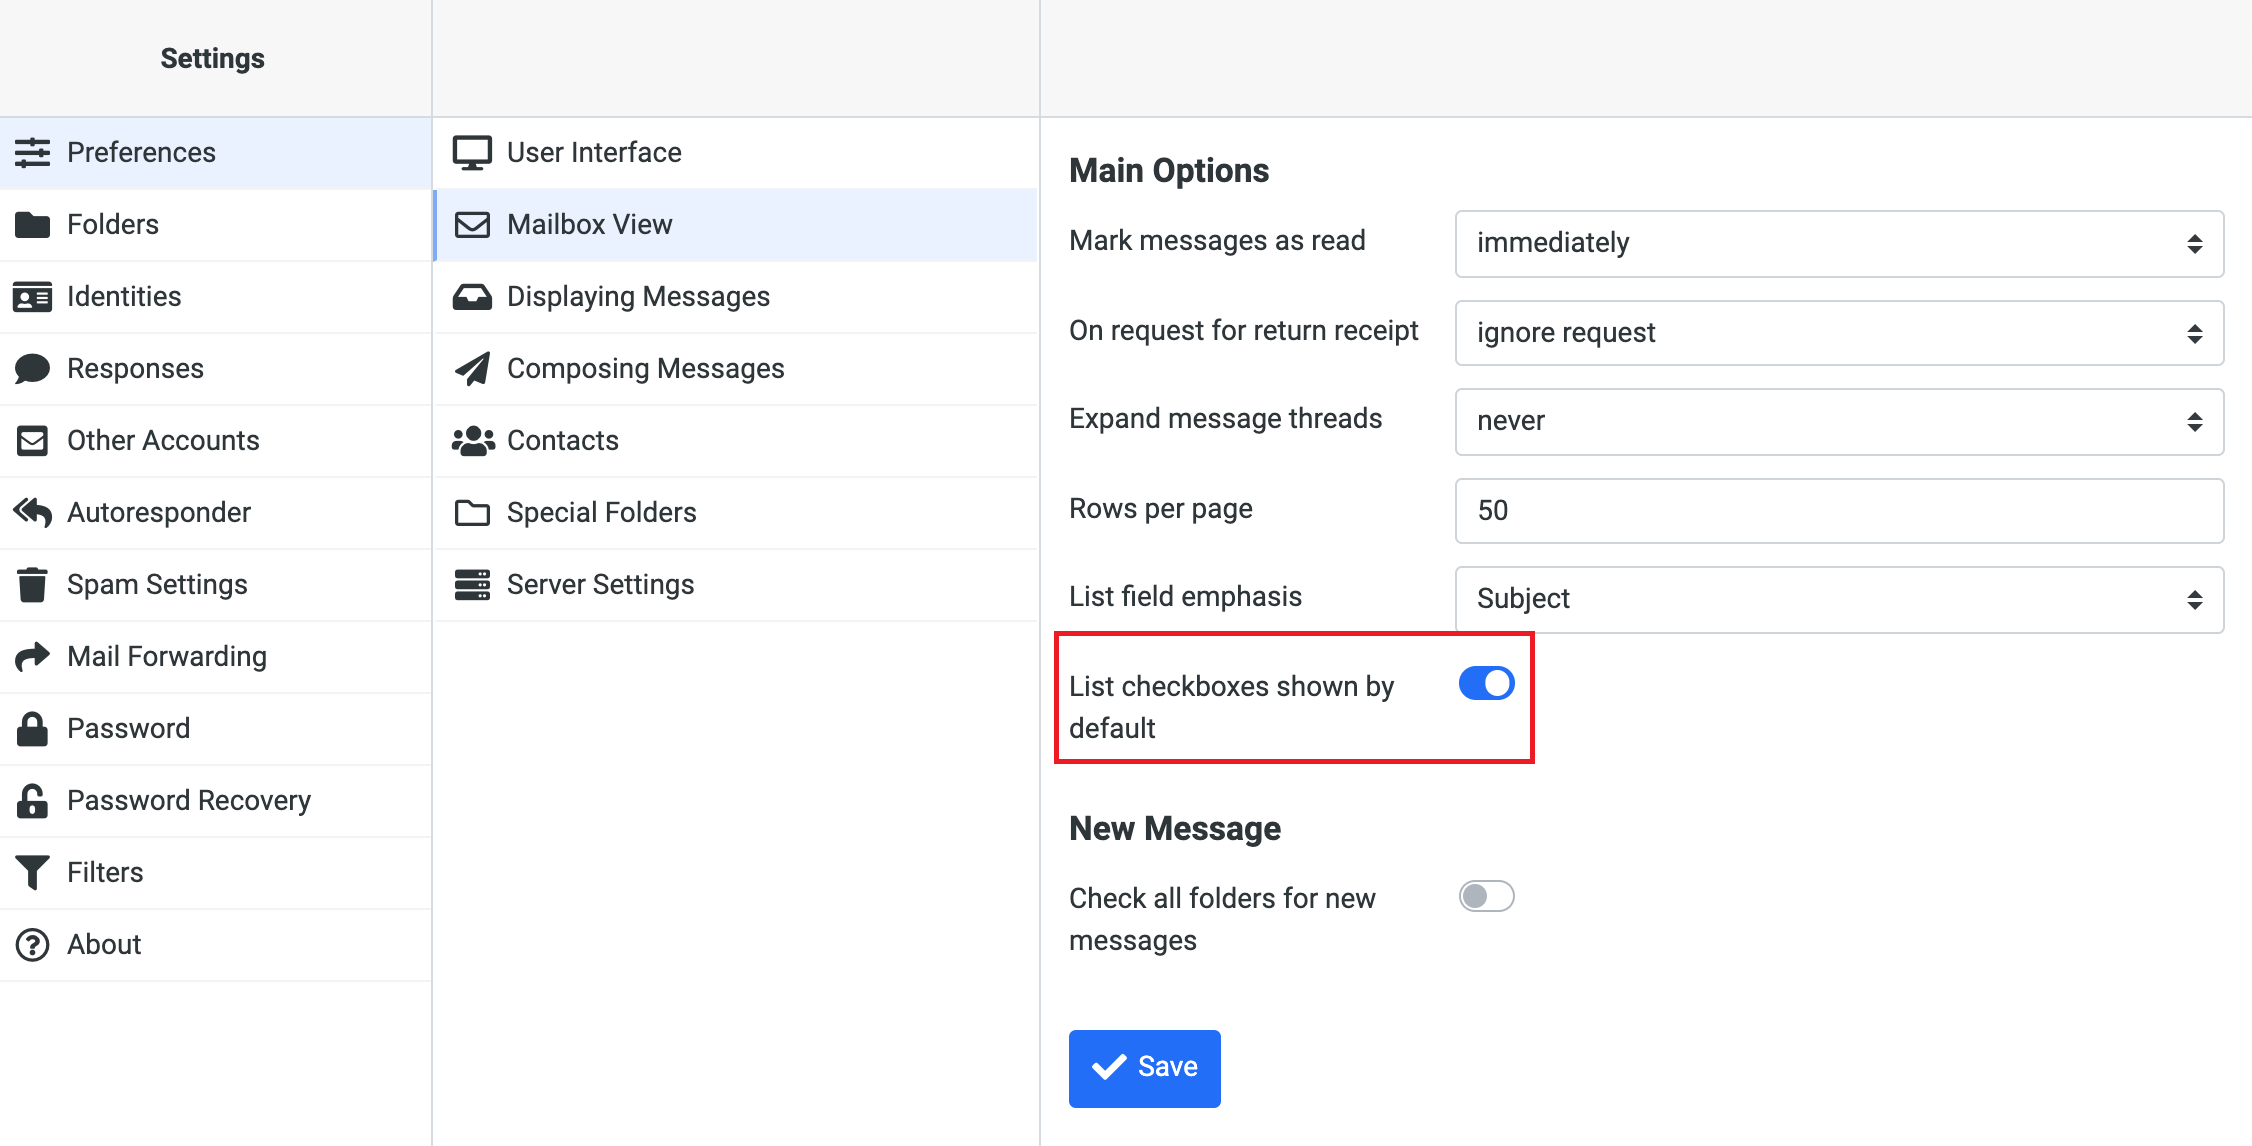
How do I select multiple emails?
In order to make it easier to select multiple emails at a time, you can turn on the ability to have checkboxes show in the mailbox list view.
- In the Settings tab, click Preferences.
- Select Mailbox View.
- Click the toggle to adjust List checkboxes shown by default.
- Click Save.
How do I adjust the subject line or the sender for better visibility?
We offer the option to have either the subject of the email or the sender emphasized for better visibility.
- In the Settings tab, click Preferences.
- Select Mailbox View.
- Click on the drop-down menu next to List field emphasis.
- Set a preference to either Subject or From/To.

Settings options and locations
Preferences map
Folders
Allows you to manage mailbox folders. You can select the folders that you want to be displayed, and you can create, rename or delete personal (not system) folders.
Identities
This section allows you to establish the:
- Name that appears on outgoing email messages
- The Organization name that is displayed
- Reply-to address
- The signature that appears in all outgoing messages
Responses
This section allows you to create and save text that you can use when replying to messages.
Other accounts
This section allows you to add another email account to be displayed in the Webmail inbox.
Password
The section allows you to change the password for your account and set up additional security like two-factor authentication and app-specific passwords if it’s enabled.
Autoresponder
This section allows you to create a message that will be sent in reply to all incoming email messages during a specific interval, such as when you are on vacation.
Spam settings
Allows you to create lists of allowed and blocked senders.
Mail forwarding
When enabled, incoming messages will be forwarded to the recipients that you list in this section.
Password recovery
Allows you to set up a backup phone number and email address to recover your password via email or SMS.
Filters
This section allows you to define how incoming mail is handled automatically.
External access
This section provides all the information needed to sync your email, contacts or calendar to an external client, like Mac Mail, Outlook, or Thunderbird.
